
You’ve finally said yes to those dream brows. Now comes the part no one talks about enough, the microblading aftercare. You just got strokes etched into your skin; it’s not the time to go back to your regular face-wash routine.
There’s a little flaking, maybe some itching, and a lot of “should I touch this?” moments. Microblading eyebrows aftercare is non-negotiable. One wrong swipe, and those clean, crisp strokes could blur faster than a smudged eyeliner.
That’s why understanding the right aftercare for microblading is your best bet to make those brows stay defined and worth every second you spend in that chair. Stick with these microblading aftercare instructions to get the best brows.
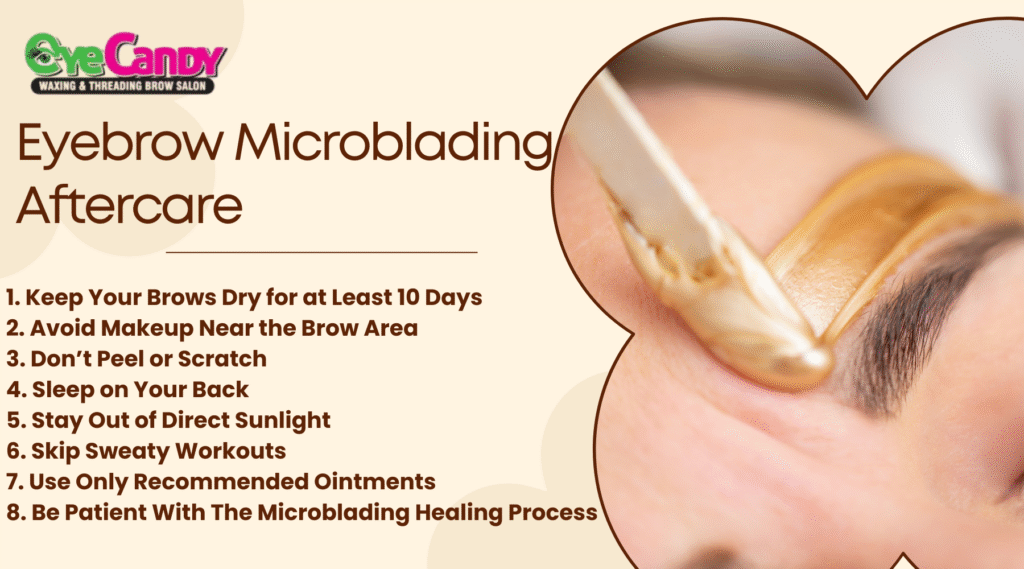
Eyebrow Microblading Aftercare
Got your brows done? But now comes the microblading healing process. The way you care for eyebrows after microblading decides how long-lasting they stay. Here’s a guide to nail your post microblading care.
1. Keep Your Brows Dry for at Least 10 Days
Use a damp cotton pad to clean around your face, avoiding the brows. A dry healing phase lets your skin hold the pigment better. If needed, use blotting paper gently to manage oil or sweat. Even steam from hot drinks or cooking can interfere.
2. Avoid Makeup Near the Brow Area
Foundation, concealer, or highlighter near your brows can cause irritation and even infection. Give your brows their own no-touch zone while they recover. If you’re heading out, work with a fresh face or skip the makeup entirely for a few days. Remember, the microblading healing process is delicate.
3. Don’t Peel or Scratch
Picking can pull out pigment and leave patchy results. Use a gentle tapping motion if the itch gets intense, or hold a clean tissue to press lightly. Let your skin do its own thing without interruption. Messing with the healing stage could ruin your microblading eyebrows shapes before they even settle.
4. Sleep on Your Back
This might sound odd, but sleeping on your face can cause smudging and uneven healing. Pressure from your pillow can shift pigment and leave you with wonky results. Try adding an extra pillow to keep your head elevated—it helps with swelling too. A sleep discipline during your post microblading care window can make a noticeable difference.
5. Stay Out of Direct Sunlight
Sun exposure is a quick way to fade fresh pigment. It can also cause redness and extra peeling. Avoid sitting by windows, skip the beach trips, and hold off on tanning beds. Wear a wide-brimmed hat if you must go out during the day. Your skin is healing, and harsh rays can delay the microblading healing process. Once you’re cleared, you can go back to your sunscreen routine.
6. Skip Sweaty Workouts
Sweat carries salt, and salt can push out pigment while your skin is still absorbing it. Take a break from gym sessions, heated yoga, or long walks in the sun. Give your body a rest and let your brows settle in peace. Once you’re past the healing days, your microblading eyebrows shapes will thank you for it.
7. Use Only Recommended Ointments
Applying the wrong product can clog pores, irritate skin, or even cause scabbing. Use clean fingers or a cotton swab, and apply a very thin layer. Keep it light and make sure your hands are clean each time. Care for eyebrows after microblading doesn’t require a shelf full of products.
8. Be Patient With The Microblading Healing Process
Your brows might look too dark, then too light, and then finally settle. It’s normal. Trust the process and resist the urge to judge too early. The full post microblading care phase can take 4–6 weeks. Touch-ups are part of it.
What to Expect During and After Your Eyebrow Session
Thinking about getting microblading brows or already booked your appointment? Let’s break it down—what really happens during your session, and what comes after.
1. The Prep Begins Before your Appointment
Before the first blade touches your skin, your artist will clean the area and might apply a numbing cream. But it actually starts even earlier—avoid caffeine and alcohol 24 hours before, and skip retinol or exfoliants for at least 3–5 days. Even your period can make you more sensitive to pain. A calm body makes for better microblading brows.
2. Brow Mapping Takes Time and Patience
Don’t expect to dive into blading the moment you sit. First, your artist will draw and measure your brows—this is brow mapping. You’ll have a say in the shape and symmetry. This is the time to speak up. The mapping might take 20–40 minutes because it sets the entire structure.
3. Expect the Pigment to Look Bold at First
Right after your session, your microblading brows will look darker and more intense than expected. The color sits on top of the skin before settling in. Over the next few days, it’ll start to lighten as scabs form and fall off.
4. Itching and Flaking are Completely Normal
At some point during the healing phase, your brows may drive you crazy with itching. But scratching or peeling the flakes can ruin the pigment placement. Just dab gently with a clean tissue or distract yourself until it passes. This stage lasts a few days.
5. Your Brows Will Go Through Weird Color Phases
One day they’re dark, the next day they seem to vanish—don’t stress. It’s part of the post microblading care cycle. As your skin heals, it comes back, lighter and more natural-looking.
6. Touch-up Is Not Optional
Your touch-up fills in the gaps, smooths the shape, and locks in the pigment. Usually done 4–8 weeks after the first appointment, this part is essential. Even if your brows seem perfect, the skin might have pushed out some pigment or healed unevenly. Your artist will adjust the shape or shade if needed.
Microblading Healing Stages
Let’s talk about the microblading healing stages:
1. Day 1–2: Brows look bold and dark
Right after your session, your brows will look darker, sharper, and way more intense than you imagined. The pigment sits on the surface at first, and swelling may add to the drama. Keep them dry and avoid touching—you’ve officially entered the microblading healing stages.
2. Day 3–4: Scabbing
Tiny scabs may appear over the brows. They won’t be huge or scary, but you’ll definitely notice some dryness and texture. Do not pick at them—let them fall off on their own. Stick to gentle cleansing and no makeup on the brows.
3. Day 5–7: Itching starts, flaking follows
Your brows will probably start flaking like dry paint. Let flakes fall off naturally, no matter how tempting it is. Scratching can pull out pigment and leave weird gaps. Use a clean cotton pad if needed and avoid sweating or exposing them to steam.
4. Day 8–10: Patchy and pale—don’t freak out
Now the scabs are gone, but your brows might look patchy, faded, or like they’ve disappeared completely. This is called the “ghosting” phase. Don’t panic—this doesn’t mean your artist did a bad job. The pigment is still settling beneath the surface, and new skin is covering it.
5. Day 11–15: Brows play hide-and-seek
At this stage, your brows might show up one day and then reappear a little different. Your skin is still adjusting, and the pigment is settling into place. This is one of the most frustrating microblading healing stages, but it’s also temporary. Don’t fix them with makeup.
6. Day 16–30: Final look begins to settle
Finally, you’ll start seeing what your brows are really going to look like. Color softens, shape looks balanced, and the texture of your skin returns to normal. If you follow before and after of microblading advice properly, this is when you’ll feel like it was worth it.
7. After 4–6 weeks: Time for touch-up
Now’s the time to book your touch-up. It’s where any faded areas get filled in, the shape is adjusted if needed, and the final polish is added. Some people retain pigment better than others, so don’t compare. This second session pulls it all together and helps your brows last longer.
8. Before and after of microblading
If you took photos from day one to week six, you’d probably laugh at the transformation. The before and after of microblading isn’t just about looks. It’s about patience, trust, and knowing every odd phase has a purpose.
Brows That Slay—Book Your Slot at Eye Candy Brow Today!

You’ve made it through the itch, the flakes, the mirror-staring obsession, and now you’re armed with all the right tips for perfect microblading aftercare.
Good brows happen when you treat them with care, follow the rules, and let your skin do its thing. Still thinking about getting yours done? Let Eye Candy Brow Salon give you the kind of arches. If you’re going for feathered, defined, or something in between, our brow experts know their way around symmetry and natural tones.
Curious about the cost of microblading eyebrows? It’s more affordable and results last for months! At Eye Candy Brow, every brow leaves looking better than it walked in. Let’s get yours ready for compliments.
FAQs
How long does microblading last?
It usually lasts between 12 to 18 months. The color may fade over time, but with proper microblading aftercare, your brows will stay looking fresh for longer.
What is microblading for the eyebrows?
It’s a manual method where pigment is added to the skin in fine hair-like strokes, giving your brows a fuller look.
How much does microblading cost?
The microblading eyebrows cost can range anywhere from ₹10,000 to ₹25,000 depending on the artist’s experience, salon setup, and location. It’s a worthwhile investment.
Is microblading permanent?
No, it’s semi-permanent. Your brows will slowly fade over time, so you can change the shape later if you want. A touch-up once a year keeps them on point.
